By Hani Jaber
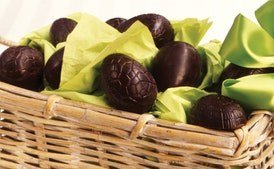
Rich and creamy Peanut Butter Chocolate Eggs, a decadent treat that combines the depth of bittersweet chocolate with the nutty sweetness of peanut butter.
30 minPrep Time
N/AServings
Nutritional Information
-Calories
-Protein
-Carbs
-Fat
-Sugar
Na-Sodium
Ingredients
- 10 1/2 ounces bittersweet chocolate, tempered
- 5 ounces bittersweet chocolate, chopped
- Generous 2 cups (about 18 ounces) smooth peanut butter
Instructions
- 1Line a rimmed baking sheet with parchment paper and place a wire rack on the parchment. Set aside.
- 2Place the tempered chocolate in a warmed bowl.
- 3Following the directions for molding chocolate (see tips, below), carefully ladle the chocolate into the mold, taking care that the chocolate covers the entire mold.
- 4Turn the mold upside down over the bowl of tempered chocolate, allowing the excess chocolate to drip out, leaving just a thin coating on each indented cup.
- 5Tap the edge of the mold to release any air bubbles that might remain in the chocolate, to ensure a perfectly smooth coating.
- 6Wipe the edge of the mold clean on the edge of the bowl (you don't want to waste a drop of chocolate), then place the chocolate-coated mold, open side down, on the wire rack.
- 7A bit more chocolate will drip off.
- 8Let stand for about 4 minutes to allow the chocolate to begin to set.
- 9Just before the chocolate has fully set, use a paring knife or pastry scraper to clean the excess chocolate from the edge of the mold, returning it to the tempered chocolate, so that the finished eggs will have nice clean edges and to make it easier to unmold them.
- 10Transfer the mold, cavity side up, to the refrigerator. Let rest for 10 minutes to allow the chocolate to harden and retract from the sides of the mold.
- 11Line the baking sheet with a clean piece of parchment paper.
- 12Remove the mold from the refrigerator and invert it onto your hand.
- 13The egg shells should fall out.
- 14If not, rest your thumbs on the outside edge of the mold and place your first two fingers on the inside of the chocolate egg shape.
- 15Gently begin to lift the chocolate from the mold.
- 16Do not press or pull too hard or the chocolate will break.
- 17Carefully place the egg shapes on the prepared baking sheet until they are ready to be filled.
- 18To make the filling, place the chopped chocolate in the top half of a double boiler.
- 19Place over (not touching) gently simmering water in the bottom pan and heat, stirring frequently, until completely melted.
- 20Remove from the heat and set aside until just cool to the touch.
- 21Do not allow it to get too cold or it will begin to harden.
- 22While the chocolate is cooling, place the peanut butter in the bowl of a stand mixer fitted with the paddle and beat on medium speed just until softened.
- 23Add the slightly warm chocolate and beat until combined.
- 24The mixture will be quite stiff, so make sure it is well blended.
- 25Using a teaspoon, fill each egg shape with the peanut butter mixture, smoothing the top with a spatula or knife.
- 26If you prefer a soft filling, let the eggs rest at room temperature for about 1 hour before serving.
- 27If a firmer texture if preferred, place the eggs in the refrigerator for about 15 minutes to allow the filling to harden, then serve.
- 28Store, in a single later, covered and refrigerated, for up to 3 days.
- 29Molding Chocolate:
- 30You cannot mold tempered chocolate successfully in wood or other porous materials.
- 31Nor is glass a good choice.
- 32When you pour tempered choccolate into a glass mold, it immediately takes on the temperature of the glass, which if it is too hot or too cold will cause the chocolate to go out of temper.
- 33Antique metal molds, with interiors that have been damaged through years of use or the passage of time, are best used as wall decorations.
- 34Flexible plastic molds are terrific, but in time they begin to show wear and must be replaced.
- 35All of this is my way of saying that firm plastic and polycarbonate molds are the best choices for molding chocolate.
- 36Although you might have heard that coating a mold with fat will make removing the finished product easier, do not try it.
- 37It will not help unmold the item; it will only make it greasy.
- 38Chocolate, like plaster, retracts as it cools, which ensures that once it has set it will easily pull away from a plastic mold.
- 39Remember, chocolate reflects the surface against which it has been molded, so if properly done, the set chocolate will be smooth and shiny.
- 40However, the chocolate must be tempered—not simply melted—or it won't release.
- 41Before you begin to fill a mold, set up your workspace: Have the tempered chocolate in a bowl.
- 42Alongside the chocolate have the mold; a ladle; a paring knife; pastry scraper; large metal offset spatula, or other smooth-edged utensil; a wire rack on a parchment- or waxed paper-lined baking sheet; and some clean kitchen towels.
- 43Using the ladle, carefully fill the mold with the liquid chocolate.
- 44Once the mold is full, invert it over the bowl of tempered chocolate and allow the excess chocolate to drop back into the bowl.
- 45If the mold is finely detailed, it will be necessary to tap on the sides to release any air bubbles that might form in the raised detail.
- 46The mold should now be evenly coated with a thin layer (usually 1/8 or 1/16 inch thick, depending on the recipe) of chocolate.
- 47Wipe the edge of the mold, or the edge surrounding each cup in the mold, clean with a paring knife or pastry scraper.
- 48Place the chocolate-coated mold, open side down, on the wire rack.
- 49Let stand for about 5 minutes, or until the chocolate begins to harden.
- 50Using the paring knife, scrape the edge of the mold absolutely clean of hardened chocolate.
- 51This is important, because the chocolate retracts from the sides of the mold as it sets, and a clean edge will keep it from sticking and cracking as it shrinks.
- 52If desired, you can place the mold in the refrigerator for a few minutes to speed the hardening, but do not leave it there for any length of time.
- 53Once you have invested in molds, they can be used over and over again.
- 54My best advice for extending the life of plastic or polycarbonate molds is to clean them with care.
- 55Wash them in hot, soapy water, carefully wiping them clean with a soft cloth (never any rough material or a scouring pad).
- 56Then rinse them well under running water and dry thoroughly, as water deposits can be as damaging to molds as scratchy scrubbers.
- 57Gluing Chocolate:
- 58If desired, you can glue two egg halves together to form a whole egg.
- 59The glue that holds molded chocolate pieces together is simply more chocolate!
- 60Melt just enough chocolate to make a fine "glue" line between the chocolate edges.
- 61Place the filled eggs in the refrigerator for about 15 minutes, so they will be cold enough to "set" the chocolate "glue" immediately when you attach them to one another.
- 62Using the melted chocolate just as you would regular glue, and working with two eggs at a time, coat the chocolate edge of one egg with the melted chocolate and then quickly put the two eggs together and hold them firmly in place.
- 63If the eggs are cold enough, the melted chocolate will set immediately.
Save this recipe and plan your week
A free account lets you save recipes, plan your meals and build grocery lists.
Or get the app: App Store · Google Play